Multiplex controlfiles with OMF

Even on the latest Oracle Engineered Systems like ODA X6-2S/M there’s only one single controlfile created by default. Despite the storage redundancy there’s always a risk of someone accidentally deleting a file or some logical corruption of the file.
Therefore, we always multiplex the controlfiles and online redo logs. But, what is the easiest way of adding a second controlfile to a database using OMF on a file system?

I think it’s the following procedure. Although, I’m gladly proven wrong with a even more elegant solution.

The command output has been stripped to the relevant information.

$ . oraenv
ORACLE_SID = [DUMMY] ? DEV1

$ rman target /


-- see, there is only one online log destination
RMAN> select name, value from v$parameter where name like 'db_create_online_log_dest_%';

NAME                                   VALUE
-------------------------------------- --------------------------------------
db_create_online_log_dest_1            /u03/app/oracle/redo/
db_create_online_log_dest_2
db_create_online_log_dest_3
db_create_online_log_dest_4
db_create_online_log_dest_5


-- set a second online log destination
RMAN> alter system set db_create_online_log_dest_2 = '/u02/app/oracle/oradata/DEV1' scope=both;


-- get the current controlfile path for later reference in commands
RMAN> select value from v$parameter where name = 'control_files';

VALUE
--------------------------------------------------------------------------------
/u03/app/oracle/redo/DEV1/controlfile/o1_mf_cwxjo46k_.ctl


-- this will make RMAN "restore" command create new controlfiles in all online log destinations
RMAN> alter system reset control_files;


-- restart instance so parameter changes will take effect
RMAN> shutdown immediate


-- only start in NOMOUNT as to be able to restore controlfile
RMAN> startup nomount


-- this will create two new OMF controlfiles based on existing one
--   remember, we have reset control_files parameter
RMAN> restore controlfile from '/u03/app/oracle/redo/DEV1/controlfile/o1_mf_cwxjo46k_.ctl';
...
channel ORA_DISK_1: copied control file copy
output file name=/u03/app/oracle/redo/DEV1/controlfile/o1_mf_cxf4q747_.ctl
output file name=/u02/app/oracle/oradata/DEV1/DEV1/controlfile/o1_mf_cxf4q74v_.ctl
Finished restore at 12-SEP-16


-- use the two newly created controlfiles at next startup
RMAN> alter system set control_files = '/u03/app/oracle/redo/DEV1/controlfile/o1_mf_cxf4q747_.ctl','/u02/app/oracle/oradata/DEV1/DEV1/controlfile/o1_mf_cxf4q74v_.ctl' scope=spfile;


-- the old controlfile is not needed anymore
RMAN> host "rm /u03/app/oracle/redo/DEV1/controlfile/o1_mf_cwxjo46k_.ctl";

RMAN> startup force

Since I’m using Oracle 12c RMAN is capable of running SQL just like this…no need to change between SQL*Plus and RMAN anymore.

(Please don’t debate the file system structure, it’s from an engineered system. I think it’s horrible!)

Synthetic data – nice little SQL feature

This blog was inspired by a Twitter conversation between Jeffrey Kemp and Franck Pachot about little SQL tricks.
Countless times I’ve created synthetic data to model a case or just play around in general. For quick and dirty and small volumes I prefer “CONNECT BY”. When doing it properly, I use recursive CTEs.

But this puts a smile on my face every time I look at it.

select
    item.getNumberVal() num
from xmltable('1 to 10,20,30,40 to 50') item
;

       NUM
----------
	 1
	 2
	 3
	 4
	 5
	 6
	 7
	 8
	 9
	10
	20
	30
	40
	41
	42
	43
	44
	45
	46
	47
	48
	49
	50

23 rows selected.

Here’s what I usually start with as a base and then tweak the script to my current needs.

drop table t1 purge;
create table t1 (
    id number
  , num_small number (5, 0)
  , num_big number
  , vc2_short varchar2(200 byte)
  , vc2_long varchar2(4000 byte)
  , dt date
  , cl clob
)
  tablespace users
  lob (cl) store as securefile t1_cl_seg (
    tablespace users
    disable storage in row
    retention auto
    nocache logging
    chunk 32K)
;
 
insert /*+ append */ into t1 (id, num_small, num_big, vc2_short, vc2_long, dt)
with datagen as (
  select --+ materialize
      rownum as id
  from
      dual
  connect by level <= 1e4
)
select
    rownum as id
  , trunc(dbms_random.value(1, 100)) as num_small
  , round(dbms_random.value(10000, 1000000), 4) as num_big
  , dbms_random.string('L', trunc(dbms_random.value(10, 200))) as vc2_short
  , dbms_random.string('A', trunc(dbms_random.value(200, 4000))) as vc2_long
  , trunc(sysdate + dbms_random.value(0, 366)) as dt
from
    datagen dg1
  , datagen dg2
where
    rownum <= 1e4
;
 
commit;
 
<<populate_lob>>
declare
  num_rows number;
  cl clob;
  chunk_size integer := 1024; -- 1 KB
  max_cl_size integer := 8192; -- 8 KB
begin
  select count(*) cnt
  into num_rows
  from t1
  ;
  
  for row_num in 1 .. num_rows loop
    dbms_lob.createtemporary(cl, false, dbms_lob.call);
 
    for idx in 1 .. trunc(dbms_random.value(1, (max_cl_size / chunk_size))) loop
      dbms_lob.writeappend(cl, chunk_size, dbms_random.string('A', chunk_size));
      null;
    end loop;
 
    update t1
      set t1.cl = populate_lob.cl
    where id = row_num
    ;
    commit;
 
    dbms_lob.freetemporary(cl);
  end loop;
end populate_lob;
/
 
--alter table t1 modify lob (cl) (cache logging);

I hope above little trick amuses you as much as it did me 🙂
Imagine, it made me blog about it!

Killing QOPATCH zombies

I recently had various cases where functions/procedures of DBMS_QOPATCH raised “ORA-20001: Latest xml inventory is not loaded into table” on Windows:

  • Platform: Windows Server 2012 R2
  • Oracle Version: 12.1.0.2.11

The issue can best be seen from SQL*Plus:

SQL> select dbms_qopatch.get_opatch_install_info from dual;
ERROR:
ORA-20001: Latest xml inventory is not loaded into table
ORA-06512: in "SYS.DBMS_QOPATCH", line 1937
ORA-06512: in "SYS.DBMS_QOPATCH", line 133

Another symptom of the issue can be found during instance startup when there is no patch information dumped to the alert.log, even though you know there are patches installed.
Extract from alert.log:

===========================================================
Dumping current patch information
===========================================================
No patches have been applied
===========================================================

Trust me, this database has patches installed 🙂
So, what’s going on…

DBMS_QOPATCH writes a log in %ORACLE_HOME%\QOpatch\qopatch_log.log. Here’s what it says:

 LOG file opened at 05/02/16 21:54:17

KUP-05004:   Warning: Intra source concurrency disabled because parallel select was not requested.

KUP-05007:   Warning: Intra source concurrency disabled because the preprocessor option is being used.

Field Definitions for table OPATCH_XML_INV
  Record format DELIMITED BY NEWLINE
  Data in file has same endianness as the platform
  Reject rows with all null fields

  Fields in Data Source: 

	XML_INVENTORY                   CHAR (100000000)
	  Terminated by "UIJSVTBOEIZBEFFQBL"
	  Trim whitespace same as SQL Loader
KUP-04004: error while reading file C:\app\oracle\product\ora1210211\QOpatch\qopiprep.bat
KUP-04017: OS message: The operation completed successfully.
KUP-04017: OS message: Argument(s) Error... Cannot use file "C:\app\oracle\product\ora1210211\QOpatch\xml_file.xml" to generate XML output.
Specify path/filename and make sure filena
KUP-04118: operation "read_pipe", location "skudmir"

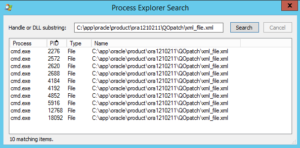
Alright, DBMS_QOPATCH calls “qopiprep.bat” as a pre-processor which in turn tries to write (and at the very end delete) a file named “xml_file.xml”. So, this file is used temporarily and should not exist when there’s currently no call to DBMS_QOPATCH running. When I checked the file was there and Process Explorer revealed that there were multiple “cmd.exe” processes having an open file handle, thus locking the file from deletion.

ps-file-handes

Most of these “cmd.exe” processes were spawned by “oracle.exe” and were not doing any work anymore. I went and killed all of them, one after another. Just be careful and make sure these processes are actually “zombies”. After killing these “cmd.exe” processes there were no locks on “xml_file.xml” anymore and DBMS_QOPATCH worked again as expected.

SQL> select dbms_qopatch.get_opatch_install_info from dual;

GET_OPATCH_INSTALL_INFO
--------------------------------------------------------------------------------
<oracleHome><UId>OracleHome-6f58d48c-880c-45ab-88b4-5831abc60f31</UId><targetTyp

Unfortunately, I haven’t been able to reproduce the issue at will. For the moment I’m fine having a solution.

Remember, datapatch/sqlpatch uses the same funcionality of DBMS_QOPATCH…so applying a patch could fail as well.

RMAN in FIRST_ROWS hell

A short while back I was doing a database upgrade/migration from 11.2.0.1 to 12.1.0.2 to a new server. To keep the downtime of the 850GB big database short I used Transportable Tablespaces together with incrementally updated backups where the datafile copies are placed on the target machine’s storage using a shared mount. So, during the downtime (as soon as the Tablespaces are set READ ONLY) all there’s left is doing the last inc 1 backup and the meta data export / import. Everything went fine on all test databases which were freshly cloned from production.
But then, around comes time for production. I started taking the inc 0 datafile copy backups a few days before. Eight long hours later I was ready to take inc 1 backups from time to time and apply them on the datafile copies. This is where all the good plans went south. Every time the “BACKUP INCREMENTAL LEVEL 1 FOR RECOVER OF COPY WITH TAG…” command ran it took about 23 seconds before RMAN actually started taking the backup. During the production downtime this is probably fine if there’s only 5 datafiles. Our database had more than 50 datafiles. And, you have to account for 50 x 23 seconds for the “RECOVER COPY OF DATAFILE…” command as well as the same problem applies there, too. Clearly, this issue needed resolving before the production downtime.

My investigation showed that above RMAN commands trigger the calling of DBMS_RCVMAN.getRcvRec which in turn calls DBMS_RCVMAN.getDataFileCopy. In there are some complex queries involving V$BACKUPSET, V$DATAFILE_COPY, etc. and one of these queries did have a very bad execution plan. First I thought there might be a problem with the object statistics on the underlying X$ tables, namely X$KCCBF, X$KCCBP and X$KCCBC. OK, the stats were somewhat stale so I gathered them for the involved X$ tables. Unfortunately, this didn’t solve the problem of the bad execution plan. Then, I remembered that during the initial analysis of the database I noticed that OPTIMIZER_MODE was set to FIRST_ROWS on the instance level (for whatever reason the SW vendor claimed this was best). Of course, this setting also affected RMAN. As the database was still fully productive I couldn’t just change the parameter to ALL_ROWS. Setting up a login trigger for RMAN seemed too intrusive. The solution was simple: run an ALTER SESSION at the start of the RMAN session and all is fine…

sql "alter session set optimizer_mode = ALL_ROWS";

Btw., on the new 12.1.0.2 database the application runs just perfectly with ALL_ROWS 😉

OTN is a bad place to download

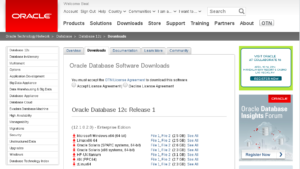
Life is hard as it is regarding Oracle licensing compliance. Then I’m wondering why, time and time again I see DBA’s download Oracle software from the Oracle Technology Network website to install on production servers.

otn-download-page
 
I’m no lawyer or otherwise in any position to assess the legal consequences, but under no circumstances do you want to run your enterprise servers covered by the OTN License Agreement. These are the terms you agree on whenever you download software from the Oracle Technology Network website (here’s the current OTN license agreement as a PDF in case Oracle will break the link some time in the future).

As a general rule DBA’s should only download Oracle software from the following two sites:

To make matters worse the zip files from OTN do not have identical content compared to the ones from support.oracle.com (never mind the fact that the contents of all three sources may be different).

# file from OTN
$ stat linuxamd64_12c_database_1of2.zip
  File: ‘linuxamd64_12c_database_1of2.zip’
  Size: 1673544724	Blocks: 3268664    IO Block: 4096   regular file
  ...

# file from support.oracle.com
$ stat p17694377_121020_Linux-x86-64_1of8.zip
  File: ‘p17694377_121020_Linux-x86-64_1of8.zip’
  Size: 1673517582	Blocks: 3268600    IO Block: 4096   regular file
  ...

Also, note that on OTN you don’t necessarily get a message digest along with your zip file. So, how can you be sure you got what you thought you’d get. On edelivery and support.oracle.com you always have MD5 and SHA-1 hashes to verify your downloads.

I hope, by now, I convinced everybody that OTN downloads are a bad fit for your enterprise Oracle environment. Thank you!

TDE safety net

You run your Oracle database with Transparent Data Encryption (TDE) and you store your Master Encryption Keys in a software keystore (wallet)?
Sure, you backup the keystore to a safe location and you are confident that in a desaster scenario you will be able to recover and open the keystore from backup. Maybe you are just a bit overconfident… or I’m paranoid. Anyway, here’s the safety net to TDE if you can’t open the keystore or any of its backups.

Whenever you create (or rekey) a Master Encryption Key you can extract all the information from the software keystore. Make sure you have a safe terminal session and nobody is watching over your shoulder (lock yourself in a room with your security officer). Write the key information on a piece of paper, envelope it and securely put it in a safe.

As you probably know from secure external password stores Oracle stores the information in a keystore as key-value pairs. This is also true for all the key information. Unitl 12c we used the “orapki” utility for keystore management. Starting with 12c you should not use that utility anymore as all operations should be performed using “ADMINISTER KEY MANAGEMENT” SQL commands.
“orapki” would not be useful in this context anyway as it won’t allow you do display the value for a given key. But, there’s still the good old “mkstore” utility which is mainly used for managing secure external password stores. This little tool allows you to display the value for a given key.
So, we (ab)use “mkstore” to extract all the Master Encryption Key information:

# read the keystore password from the command prompt
read -s -p "Keystore password: " keypass

# 1) get all TDE related key entries from the keystore
# 2) print the key-value pairs for each key entry
for secret in $(echo ${keypass} \
  | mkstore -wrl ${ORACLE_BASE}/admin/${ORACLE_SID}/wallet/tde -list \
  | grep '^ORACLE.SECURITY');
do
  echo ${keypass} \
     | mkstore -wrl ${ORACLE_BASE}/admin/${ORACLE_SID}/wallet/tde -viewEntry ${secret} \
     | grep '^ORACLE.SECURITY'
done

Note: even though Oracle probably didn’t think of this as a use case for “mkstore” I don’t see anything why this operation should not be supported.

Here’s a sample output of above script anotated with some comments:

# this is the actual Master Encryption Key
ORACLE.SECURITY.DB.ENCRYPTION.AfUlOfRdpE/VvwpTbMGlxlIAAAAAAAAAAAAAAAAAAAAAAAAAAAAA = AEMAASAAPoVGwpf57OTqOnRzOLr5ElAOOO7JDfZm7Gf1GtEIBwQDEADaxjuiRvu9qTEz0HBp6vp7BQcAeHQBHw0iPA==

# This matches column KEY_ID in V$ENCRYPTION_KEYS
# It holds the ID of the currently active Master Encryption KEY
ORACLE.SECURITY.DB.ENCRYPTION.MASTERKEY = AfUlOfRdpE/VvwpTbMGlxlIAAAAAAAAAAAAAAAAAAAAAAAAAAAAA

# I'm not quite sure, I think this matches column WALLET_TYPE in V$ENCRYPTION_WALLET
ORACLE.SECURITY.ID.ENCRYPTION. = PASSWORD

# This matches column FULLY_BACKED_UP in V$ENCRYPTION_WALLET
# "KB" probably stands for "Key Backup"
ORACLE.SECURITY.KB.ENCRYPTION. = ORACLE.KEY.STORE.NOT.BACKED.UP

# This is the rest of the information in V$ENCRYPTION_KEYS encoded in some format
# "KM" probably stands for "Key Metadata" (or something like that)
ORACLE.SECURITY.KM.ENCRYPTION.AfUlOfRdpE/VvwpTbMGlxlIAAAAAAAAAAAAAAAAAAAAAAAAAAAAA = 019C0001000D7874011F0C223C2CE54D28153C000D7874011F0C232837D0ECD8153C0000000000000003001E53595300000000000000000000000000000000000000000000000000000000330090D128C43600000004001E44455631000000000000000000000000000000000000000000000000000000000001FFFFFFFF00000004001E444556310000000000000000000000000000000000000000000000000000000100000008001E43444224524F4F5400000000000000000000000000000000000000000000000000010010286F66C41A66075DE0531F38A8C0351F0000000000000003001E5359530000000000000000000000000000000000000000000000000000000090D128C43600000004001E44455631000000000000000000000000000000000000000000000000000000000001FFFFFFFF00000004001E444556310000000000000000000000000000000000000000000000000000000100000008001E43444224524F4F5400000000000000000000000000000000000000000000000000010010286F66C41A66075DE0531F38A8C0351F00000001

# This matches column TAG in V$ENCRYPTION_KEYS (the tag specified in the ADMINISTER KEY MANAGEMENT command)
# "KT" probably stands for "Key Tag"
ORACLE.SECURITY.KT.ENCRYPTION.AfUlOfRdpE/VvwpTbMGlxlIAAAAAAAAAAAAAAAAAAAAAAAAAAAAA = DEV1_MK_ACT

 
Recover (re-create) the keystore
Now, in case we lose the keystore and all its backups we can re-create the keystore with all its necessary content. Just get the notes from the safe.

Create a new, empty keystore

administer key management
  create keystore '<ORACLE_BASE>/admin/<ORACLE_SID>/wallet/tde'
  identified by "<KEYSTORE-PASSWORD>"
;

Insert the key information using “mkstore”

# Example with actual values from above sample output
read -s -p "Keystore password: " keypass
echo ${keypass} | mkstore -wrl ${ORACLE_BASE}/admin/${ORACLE_SID}/wallet/tde \
  -createEntry ORACLE.SECURITY.DB.ENCRYPTION.AfUlOfRdpE/VvwpTbMGlxlIAAAAAAAAAAAAAAAAAAAAAAAAAAAAA AEMAASAAPoVGwpf57OTqOnRzOLr5ElAOOO7JDfZm7Gf1GtEIBwQDEADaxjuiRvu9qTEz0HBp6vp7BQcAeHQBHw0iPA==

echo ${keypass} | mkstore -wrl ${ORACLE_BASE}/admin/${ORACLE_SID}/wallet/tde \
  -createEntry ORACLE.SECURITY.DB.ENCRYPTION.MASTERKEY AfUlOfRdpE/VvwpTbMGlxlIAAAAAAAAAAAAAAAAAAAAAAAAAAAAA

echo ${keypass} | mkstore -wrl ${ORACLE_BASE}/admin/${ORACLE_SID}/wallet/tde \
  -createEntry ORACLE.SECURITY.ID.ENCRYPTION. PASSWORD

echo ${keypass} | mkstore -wrl ${ORACLE_BASE}/admin/${ORACLE_SID}/wallet/tde \
  -createEntry ORACLE.SECURITY.KB.ENCRYPTION. ORACLE.KEY.STORE.NOT.BACKED.UP

echo ${keypass} | mkstore -wrl ${ORACLE_BASE}/admin/${ORACLE_SID}/wallet/tde \
  -createEntry ORACLE.SECURITY.KM.ENCRYPTION.AfUlOfRdpE/VvwpTbMGlxlIAAAAAAAAAAAAAAAAAAAAAAAAAAAAA 019C0001000D7874011F0C223C2CE54D28153C000D7874011F0C232837D0ECD8153C0000000000000003001E53595300000000000000000000000000000000000000000000000000000000330090D128C43600000004001E44455631000000000000000000000000000000000000000000000000000000000001FFFFFFFF00000004001E444556310000000000000000000000000000000000000000000000000000000100000008001E43444224524F4F5400000000000000000000000000000000000000000000000000010010286F66C41A66075DE0531F38A8C0351F0000000000000003001E5359530000000000000000000000000000000000000000000000000000000090D128C43600000004001E44455631000000000000000000000000000000000000000000000000000000000001FFFFFFFF00000004001E444556310000000000000000000000000000000000000000000000000000000100000008001E43444224524F4F5400000000000000000000000000000000000000000000000000010010286F66C41A66075DE0531F38A8C0351F00000001

echo ${keypass} | mkstore -wrl ${ORACLE_BASE}/admin/${ORACLE_SID}/wallet/tde \
  -createEntry ORACLE.SECURITY.KT.ENCRYPTION.AfUlOfRdpE/VvwpTbMGlxlIAAAAAAAAAAAAAAAAAAAAAAAAAAAAA DEV1_MK_ACT

Open the keystore in the database and you can access your TDE encrypted data again.

administer key management
  set keystore open
  identified by "<KEYSTORE-PASSWORD>";

 
Some thoughts
From a security perspective I think the Master Encryption Keys should not be extractable by printing it in the terminal session. This is not secure. On the other hand you probably should be using a HSM anyway.
TDE can be scary as you might possibly loose all the data in the encrypted tablespaces. In the odd case you use software key stores the Master Encryption Key extract can be a live saver. Just get your security officer involved to discuss how to handle the plain-text key information in a secure manner (and maybe now you’ll get a HSM).

Enterprise User Security – Part 4

Before we start registering databases and creating users and groups in the directory, we must first patch our Oracle 12c database homes. If you followed me since part 1 of this series you already have the necessary binaries to update OPatch and install database patch 19285025. Since I assume most of you are professional DBAs I’m not going into the details of applying the database patch. Unfortunately, the patch read-me does not tell you to re-link the LDAP client binaries which actually is the crucial bit.

cd ${ORACLE_HOME}/ldap/lib
make -f ins_ldap.mk ORACLE_HOME=${ORACLE_HOME} clientonlyinstall

 
Register a database
For the database to be able to communicate with the directory service we must register it with the OUD. The database will be an entity in the directory and is required to authenticate itself as such.

Configure ldap.ora:
This will let the database know where to contact the directory server.

vi ${TNS_ADMIN}/ldap.ora

DIRECTORY_SERVERS=(<OUD_SERVER>:1389:1636)
DIRECTORY_SERVER_TYPE=OID
DEFAULT_ADMIN_CONTEXT="dc=spotonoracle,dc=ch"

Configure sqlnet.ora:
The database will use a wallet to store the credentials used to authenticate itself with the directory service. If the database is already using a wallet for some other feature, you can share it.

mkdir /u01/app/oracle/admin/${ORACLE_SID}/wallet

vi ${TNS_ADMIN}/sqlnet.ora
 
NAMES.DIRECTORY_PATH = (LDAP, TNSNAMES, EZCONNECT)
WALLET_LOCATION =
  (SOURCE =
    (METHOD = FILE)
    (METHOD_DATA =
      (DIRECTORY = /u01/app/oracle/admin/$ORACLE_SID/wallet)
    )
  )

Define how the database will login to OUD:

alter system set ldap_directory_access=password scope=both;

 
Registering the database:
The DBCA (Database Configuration Assistant) is used to register databases with the directory service. The password used by the database for authentication is generated automatically and stored in the wallet. The wallet password is provided by you. If you already have a wallet the DBCA will just add the necessary entry, otherwise it will create a new wallet.

dbca -silent \
  -configureDatabase \
  -sourceDB "${ORACLE_SID}" \
  -registerWithDirService true \
  -dirServiceUserName "cn=diradmin" \
  -dirServicePassword "Complex-1-Password" \
  -walletPassword 'Wallet-1-Password'

You can view the registration password generated by the DBCA:

mkstore -wrl /u01/app/oracle/admin/${ORACLE_SID}/wallet -viewEntry ORACLE.SECURITY.PASSWORD

Verify the dababase is an entity in the directory:

ldapsearch -D "cn=diradmin" -w "Complex-1-Password" -h <OUD_SERVER> -p 1389 -b dc=spotonoracle,dc=ch cn=${ORACLE_SID} -LLL

From now on, as a nice side effect, clients (e.g. SQL*Plus) can use OUD as TNS names resolution service.

Prepare the database EUS user and roles
You’ll most likely going to use shared schemas, so that’s what I’m doing here.
I create a globally identified user. This means, the database will be using the directory service to authenticate client connection request. This user does not get any privileges or roles granted at all.
The newly created global role gets all the privileges and roles that are required for the users in a given functional role.

create user eus_user identified globally;

create role eus_dba_role identified globally;
grant create session to eus_dba_role;
grant dba to eus_dba_role;

 
Prepare directory objects
There are certain tasks that are more easily performed in the ODSM web console, e.g. create users and groups. We want to create the following structure in the GUI:
00-target-structure-odsm

Create a group named “Users” to hold user entities. Navigate to level: “Root” => “dc=spotonoracle,dc=ch” and create a “Static Group Entry”:
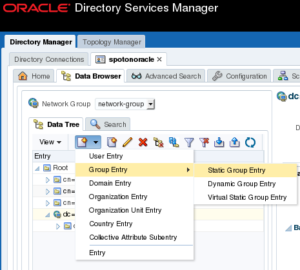
01-create-group-menu

In the group details, enter the common name: Users
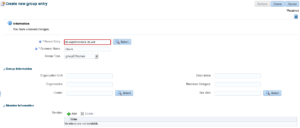
02-create-users-group

Create another static group named “Groups” on the same level as “Users” (dc=spotonoracle,dc=ch):
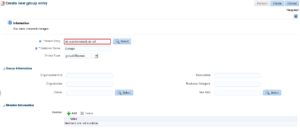
03-create-groups-group

Create a DBA Group named “DBAdmins” under the “Groups” group. In the left tree, navigate to “Groups” and add a new static group “DBAdmins” below:
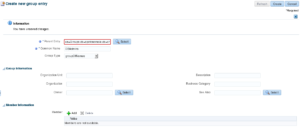
04-create-dbadmins-group

Create a user named “admjohn”. In the left tree, navigate to group “Users” and create a “User Entry”:
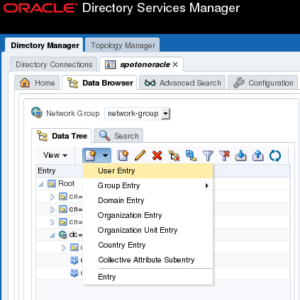
05-create-user-menu

Fill in the user’s details. Note, the field “User ID” maps to the user name that will be provided in the database connection string. “User Password” is the password that the end user will provide to authenticate with the database.
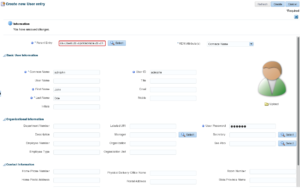
06-create-admjohn

Important: the user object must have some special attributes. This is what makes the user entity a EUS user from a directory services perspective.
In the tree, click on the user and switch to tab “Attributes”. Add following “Object Classes” to the “Mandatory Attributes”:
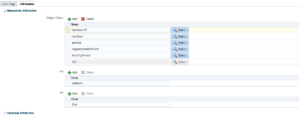
  • orclUser
  • orclUserV2

07-create-admjohn-attributes

Add user “admjohn” to the “DBAdmins” group. In the tree click on “DBAadmins”, under “Member Information” click “Add” and select “cn=admjohn,cn=Users,dc=spotonoracle,dc=ch”.
08-create-group-membership

OK, let’s get some coffee

If you’re still with me but lost a little track, we should take another look at the bigger picture I showed in part 1.
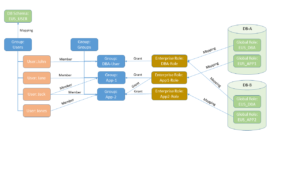
eus-relationship
So far we have covered:

  • Green: objects in the database
  • Blue: groups of objects in the LDAP directory
  • Red: user entities in the LDAP directory

What we’re going to do next is:

  • Yellow: enterprise roles in the LDAP directory
  • All the mappings (arrows)
  • All the grants (arrows)

This will be quite a lengthy post but don’t think it makes much sense to break it up in pieces. I will go on…but this time, using the Oracle EUSM utility (it’s documented in MOS note 1085065.1). Alternatively, you can do the same thing in the Enterprise Manager web console (perhaps more comfortable in a GUI). I like the CLI because it’s self-documenting and scriptable.

Create enterprise roles, mappings, and grants

Set default schema for all our enterprise users in the “Users” group. This will create the mapping for the group “Users” to database schema “EUS_USER”, and inherently all users in that group.

eusm createMapping \
  domain_name="OracleDefaultDomain" \
  map_type="SUBTREE" \
  map_dn="cn=Users,dc=spotonoracle,dc=ch" \
  schema="EUS_USER" \
  realm_dn="dc=spotonoracle,dc=ch" \
  ldap_host=<OUD_SERVER> \
  ldap_port=1389 \
  ldap_user_dn="cn=diradmin" \
  ldap_user_password="Complex-1-Password"

Previously, we have created a global role “EUS_DBA_ROLE” in the database. We need a matching role entity in the directory and call the enterprise role “DBARole”.

eusm createRole \
  enterprise_role="DBARole" \
  domain_name="OracleDefaultDomain" \
  realm_dn="dc=spotonoracle,dc=ch" \
  ldap_host=<OUD_SERVER> \
  ldap_port=1389 \
  ldap_user_dn="cn=diradmin" \
  ldap_user_password="Complex-1-Password"

Create a mapping between the enterprise role and the database role. The enterprise role can be mapped to many databases. For your sanity’s sake I don’t recommend to mix and match a lot.
E.g. Map the “DBARole” enterprise role only to the same role (incl. its definition) on multiple database. In this case the database role should be EUS_DBA_ROLE with the exact same grants on all database. Otherwise don’t map it to “DBARole” and create a separate enterprise role.

eusm addGlobalRole \
  enterprise_role="DBARole" \
  domain_name="OracleDefaultDomain" \
  realm_dn="dc=spotonoracle,dc=ch" \
  database_name="${ORACLE_SID}" \
  global_role="EUS_DBA_ROLE" \
  dbuser="system" \
  dbuser_password="<SYSTEM_PASSWORD>" \
  dbconnect_string="<DB_HOST_NAME>:<LISTENER_PORT>/<DB_SERVICE_NAME>" \
  ldap_host=<OUD_SERVER> \
  ldap_port=1389 \
  ldap_user_dn="cn=diradmin" \
  ldap_user_password="Complex-1-Password"

What’s left missing is the grant. We grant the role “DBARole” to the “DBAdmins” group. All the members of the “DBAdmins” group inherit this role grant.

eusm grantRole \
  enterprise_role="DBARole" \
  domain_name="OracleDefaultDomain" \
  realm_dn="dc=spotonoracle,dc=ch" \
  group_dn="cn=DBAdmins,cn=Groups,dc=spotonoracle,dc=ch" \
  ldap_host=<OUD_SERVER> \
  ldap_port=1389 \
  ldap_user_dn="cn=diradmin" \
  ldap_user_password="Complex-1-Password"

 
Voilà

$ sqlplus admjohn/************@<DB_HOST_NAME>:<LISTENER_PORT>/<DB_SERVICE_NAME>
SQL> select * from session_roles;
ROLE
--------------------------------------------------------------------------------
EUS_DBA_ROLE

 
Summary
With the fourth part of this series I conclude the basic setup of OUD, ODSM, and EUS. If I find the time I’m going to show some other aspects of OUD and EUS (directory replication, custom SSL certificates, directory disaster recovery or some more complex EUS setups). We’ll see…
So long, enjoy EUS.
Enterprise User Security – Part 3

Today we’re going to install Oracle Directory Services Manager (ODSM). To run ODSM we need Weblogic with Oracle Application Developer Framework (ADF). Let’s assume we have a JDK installed as shown in the previous part of this series.

Install Weblogic

Create the response file:

vi /tmp/silent_wls.xml

<?xml version="1.0" encoding="UTF-8"?>
<bea-installer> 
  <input-fields>
    <data-value name="BEAHOME" value="/u01/app/oracle/product/mdlw11119" />
    <data-value name="WLS_INSTALL_DIR" value="/u01/app/oracle/product/mdlw11119/wlserver1036" />
    <data-value name="OCP_INSTALL_DIR" value="/u01/app/oracle/product/mdlw11119/coherence1036" />
    <data-value name="COMPONENT_PATHS" value="WebLogic Server/Core Application Server|WebLogic Server/Administration Console|WebLogic Server/Configuration Wizard and Upgrade Framework|WebLogic Server/Web 2.0 HTTP Pub-Sub Server|WebLogic Server/WebLogic JDBC Drivers|WebLogic Server/Third Party JDBC Drivers|WebLogic Server/WebLogic Server Clients|WebLogic Server/WebLogic Web Server Plugins|WebLogic Server/UDDI and Xquery Support" />
    <data-value name="INSTALL_NODE_MANAGER_SERVICE" value="no" />
    <data-value name="NODEMGR_PORT" value="5556" />
    <data-value name="INSTALL_SHORTCUT_IN_ALL_USERS_FOLDER" value="no"/>
    <data-value name="LOCAL_JVMS" value="/usr/java/jdk1.7.0_85"/>
  </input-fields> 
</bea-installer>

Feed the response file to the OUD installer:

mkdir /tmp/tmpwls
unzip V29856-01.zip -d /tmp/tmpwls
cd /tmp/tmpwls

umask 0027 # pre-requisite from the WLS installation guide
java -d64 -Xmx1024m -jar wls1036_generic.jar \
  -mode=silent -silent_xml=/tmp/silent_wls.xml

rm -rf /tmp/tmpwls

 
Install ADF

Create the response file:

ADF will be installed in MW_HOME/oracle_common. If you want to specifiy the directory name add “ORACLE_HOME=/<...>” to the response file.

vi /tmp/silent_adf.rsp

[ENGINE]
Response File Version=1.0.0.0.0
[GENERIC]
SPECIFY_DOWNLOAD_LOCATION=false
SKIP_SOFTWARE_UPDATES=true
SOFTWARE_UPDATES_DOWNLOAD_LOCATION=
MIDDLEWARE_HOME=/u01/app/oracle/product/mdlw11119
APPSERVER_TYPE=WLS

[SYSTEM]
[APPLICATIONS]
[RELATIONSHIPS]

Feed the response file to the OUD installer:

mkdir /tmp/tmpadf
unzip p20996481_111190_Generic.zip -d /tmp/tmpadf
cd /tmp/tmpadf

./Disk1/runInstaller -silent \
  -responseFile /tmp/silent_adf.rsp \
  -jreLoc /usr/java/jdk1.7.0_85

rm -rf /tmp/tmpadf

 
Create the ODSM Weblogic domain

Create the response file (WLST script):

Replace following place holders in the script with your values:
=> password for the “weblogic” user
=> host name of your WLS server

vi /tmp/create_odsm_domain.py

#!/usr/bin/python
import os, sys
readTemplate(r'/u01/app/oracle/product/mdlw11119/wlserver1036/common/templates/domains/wls.jar')
cd(r'/Security/base_domain/User/weblogic')
cmo.setPassword('<WEBLOGIC_PASSWORD>')
cd(r'/Server/AdminServer')
cmo.setName('AdminServer')
cmo.setListenPort(7001) # HTTP port
cmo.setListenAddress('<HOST_NAME>')
setOption('JavaHome', '/usr/java/jdk1.7.0_85')
setOption('ServerStartMode', 'prod')
create('AdminServer','SSL')
cd(r'/Servers/AdminServer/SSL/AdminServer')
cmo.setEnabled(true)
cmo.setListenPort(7002) # HTTPS port
cmo.setHostnameVerificationIgnored(true)
cmo.setHostnameVerifier(None)
cmo.setTwoWaySSLEnabled(false)
cmo.setJSSEEnabled(true)
writeDomain(r'/u01/app/oracle/product/mdlw11119/user_projects/domains/ODSM')
closeTemplate()
exit()

Feed the scritp to WLST:

${MW_HOME}/oracle_common/common/bin/wlst.sh /tmp/create_odsm_domain.py

 
Configure the ODSM Weblogic domain

Create the response file (WLST script):

vi /tmp/configure_odsm_domain.py

#!/usr/bin/python
import os, sys
readDomain('/u01/app/oracle/product/mdlw11119/user_projects/domains/ODSM')
addTemplate(r'/u01/app/oracle/product/mdlw11119/oud11123/common/templates/applications/oracle.odsm_11.1.1.5.0_template.jar')
updateDomain()
closeDomain()
exit()

 
Feed the scritp to WLST:

${MW_HOME}/oracle_common/common/bin/wlst.sh /tmp/configure_odsm_domain.py

 
Start WLS and login to ODSM

cd /u01/app/oracle/product/mdlw11119/user_projects/domains/ODSM/bin

# if the WLS domain is deployed in production mode as we did
#   then export WLS_USER and WLS_PW before calling startWebLogic.sh
export WLS_USER=weblogic
export WLS_PW=Weblogic-1-Password

nohup ./startWebLogic.sh > wls-start.log 2>&1 &

 
Now, you can login to the OUD directory with ODSM: https://hostname:7002/odsm

odsm-login-screen
 
Welcome to ODSM…

Enterprise User Security – Part 2

By now, you should have all the sources ready to start installing.

As OUD is a pure Java application we first install the JDK (run this as the root user).

Install JDK

mkdir /tmp/tmpjava
unzip p13079846_17000_Linux-x86-64.zip -d /tmp/tmpjava

rpm -Uhv /tmp/tmpjava/jdk-7u85-linux-x64.rpm

rm -rf /tmp/tmpjava

As I’m an Oracle database guy I’m going to install OUD under the “oracle” user. Make sure to have the the JDK set in your installation user’s environment.

vi ~/.bash_profile

export JAVA_HOME=/usr/java/jdk1.7.0_85
export PATH=${JAVA_HOME}/bin:${PATH}

 
Install OUD

Create the response file:

vi /tmp/silent_oud.rsp

[ENGINE]
Response File Version=1.0.0.0.0

[GENERIC]
SPECIFY_DOWNLOAD_LOCATION=false
SKIP_SOFTWARE_UPDATES=true
SOFTWARE_UPDATES_DOWNLOAD_LOCATION=
# where the OUD software will be installed
ORACLE_HOME=/u01/app/oracle/product/mdlw11119/oud11123
MIDDLEWARE_HOME=/u01/app/oracle/product/mdlw11119
CONFIG_WIZARD_RESPONSE_FILE_LOCATION=0

[SYSTEM]
[APPLICATIONS]
[RELATIONSHIPS]

Feed the response file to the OUD installer:

mkdir /tmp/tmpoud
unzip V75929-01.zip -d /tmp/tmpoud

cd /tmp/tmpoud
./Disk1/runInstaller -silent \
  -responseFile /tmp/silent_oud.rsp \
  -jreLoc /usr/java/jdk1.7.0_85

rm -rf /tmp/tmpoud

Done. OUD software is installed on your server.
 
Patch OUD

As mentioned in the previous blog post we need to patch OUD for Oracle 12c “eusm” utility to be able to connect.

export ORACLE_HOME=/u01/app/oracle/product/mdlw11119/oud11123
export PATH=${ORACLE_HOME}/OPatch:${PATH}

mkdir /tmp/oudpatch
unzip p20529805_111230_Generic.zip -d /tmp/oudpatch

# if patching a running OUD we need to stop it for patching
# cd /u01/app/oracle/product/mdlw11119/asinst_1/OUD/bin
# ./stop-ds

cd /tmp/oudpatch/20529805
opatch apply

rm -r /tmp/oudpatch/

 
Configure OUD

By default, the instance created is MW_HOME/asinst_1. By exporting following variable before calling oud-setup the instance name can be set:
# export INSTANCE_NAME=;

cd /u01/app/oracle/product/mdlw11119/oud11123

# we write the password of the directory root user into a file
#   unfortunately, that's how the OUD tools work
#   personally, I think this is one of the worst command line tool design
_PWFILE_ADM_=/tmp/pwfile-adm.txt
echo "Complex-1-Password" > ${_PWFILE_ADM_}

# create the OUD instance with default name asinst_1;
./oud-setup --cli \
  --baseDN dc=spotonoracle,dc=com \
  --addBaseEntry \
  --integration eus \
  --ldapPort 1389 \
  --adminConnectorPort 4444 \
  --rootUserDN cn=diradmin \
  --rootUserPasswordFile ${_PWFILE_ADM_} \
  --enableStartTLS \
  --ldapsPort 1636 \
  --generateSelfSignedCertificate \
  --hostname $(hostname) \
  --no-prompt --noPropertiesFile

# delete the password file
rm ${_PWFILE_ADM_}

Check the status of the OUD instance.

/u01/app/oracle/product/mdlw11119/asinst_1/OUD/bin/status

 
Why exactly did we patch?

By default OUD only supports irreversible hashing algorithms for the root user password policy. The patch allows us to configure AES as an additional method.

_PWFILE_ADM_=/tmp/pwfile-adm.txt
echo "Complex-1-Password" > ${_PWFILE_ADM_}

cd /u01/app/oracle/product/mdlw11119/asinst_1/OUD/bin

# check what's currently configured
./dsconfig -h $(hostname) -p 4444 -D "cn=diradmin" \
  --bindPasswordFile ${_PWFILE_ADM_} \
  get-password-policy-prop --policy-name "Root Password Policy" \
  --no-prompt \
  --trustAll
# shoud be SHA-512

# add AES as additional algorithm
./dsconfig -h $(hostname) -p 4444 -D "cn=diradmin" \
  --bindPasswordFile ${_PWFILE_ADM_} \
  set-password-policy-prop --policy-name "Root Password Policy" \
    --add default-password-storage-scheme:AES \
  --no-prompt \
  --trustAll

# always delete the password file
rm ${_PWFILE_ADM_}

As it happens the password was hashed using SHA-512 during the installation. We must change the password in order to make OUD hashing the password using the AES algorithm. Let’s change the password back and forth.

cd /u01/app/oracle/product/mdlw11119/asinst_1/OUD/bin
_PWFILE_ADM_=/tmp/pwfile-adm.txt

# change the password to some temporary value
echo "Complex-1-Password" > ${_PWFILE_ADM_}
./ldappasswordmodify -h $(hostname) -p 4444 -D "cn=diradmin" \
  -j ${_PWFILE_ADM_} \
  --useSSL \
  --trustAll \
  -c Complex-1-Password \
  -n Temp-1-Password

# change it back to the original value
echo "Temp-1-Password" > ${_PWFILE_ADM_}
./ldappasswordmodify -h $(hostname) -p 4444 -D "cn=diradmin" \
  -j ${_PWFILE_ADM_} \
  --useSSL \
  --trustAll \
  -c Temp-1-Password \
  -n Complex-1-Password

# verify that AES was used as well as SHA-512
echo "Complex-1-Passowrd" > ${_PWFILE_ADM_}
./ldapsearch -h $(hostname) -p 4444 -D "cn=diradmin" \
  --useSSL \
  --trustAll \
  -j ${_PWFILE_ADM_} \
  -b "cn=Directory Manager,cn=Root DNs,cn=config" \
  -s base objectclass=* userpassword
# should show 2 lines output: one with SHA-512, one with AES

# never forget to delete the password file
rm ${_PWFILE_ADM_}

 
Your OUD instance is ready for use with Enterpise User Security.
Next, I’m going to show how to install ODSM so you easily browse and configure the directory in your web browser.

Start and stop the OUD service

cd /u01/app/oracle/product/mdlw11119/asinst_1/OUD/bin

# start OUD
./start-ds

# stop OUD
./stop-ds

Enterprise User Security – Part 1

After having the pleasure to work with EUS there is no going back. I like EUS so much it makes me wonder why the adoption of this feature is so small. Maybe because it’s such a huge PITA to install and setup (just kidding, I know the licenses cost some a bag full of money. Moreover, most organization don’t seem to care enough about their total mess in identity and access management).

What I’m going to show in this series is what is necessary to make EUS happen on the currently latest version of OUD (11.1.2.3) and the Oracle database (12.1.0.2). As usual, there is some patching and working around to do.

But, first things first. What software do we need and what is each component for?

Oracle Unified Directory
OUD is the directory service to which the database is making requests about users, credentials and privileges (roles). OUD is a LDAP directory based on OpenDS. It’s a pure Java application with a integrated Berkley DB backend.

Oracle Directory Services Manager
This component is optional but will make your life so much easier. ODSM is a web-based GUI to manage OUD. You use it to configure OUD, setup replication between multiple OUD’s and manage your users, groups, etc. ODSM is an application deployed on Weblogic and is using ADF.

Download Software
Java JDK: Version 7 (latest Update)
– download from support.oracle.com / Patch 1307984

Weblogic Server 11gR1 (Generic and Coherence): Version 10.3.6
– download from edelivery.oracle.com / Part-No.: V29856-01

Oracle Application Development Framework (ADF): Version 11.1.1.9.0
– download from support.oracle.com (Patch 20996481 / p20996481_111190_Generic.zip)

Oracle Unified Directory (OUD): Version 11.1.2.3.0
– download from edelivery.oracle.com / Part-No.: V75929-01

Required Patches
As I said before, there are some patches required for everything playing nice together.

Database 12.1.0.2 requires patch to support SHA-2 with SSL:
– p19285025_121020_Linux-x86-64.zip
– get latest OPatch (6880880) for your database home version as per patch note

OUD 11.1.2.3 requires patch to allow EUSM tool to connect:
– p20529805_111230_Generic.zip
– your current opatch version in the MW home should be high enough (OPatch version 11.1.0.11.0) to apply this patch

Happy downloading…


Wrap your head around EUS
Meanwhile, let’s quickly look at what it’s all about – in case you’re new to this EUS business. The following diagram is an attempt to put everything in one picture what is scattered in the documentation: Database Enterprise User Security Administrator’s Guide.

eus-relationship

Coloring scheme:
– Green: objects in the database
– Blue: groups of objects in the LDAP directory
– Red: user entities in the LDAP directory
– Yellow: enterprise roles in the LDAP directory

There’s a group of users and each user is a member of one or more (functional) groups. The “Users” group is mapped to a database schema EUS_USER. This means every database login from one of these users will physically connect to the EUS_USER schema in the databases. Every functional group is granted one or more enterprise roles. Each enterprise role is mapped to a role in one or more databases.

What’s next
I’m going to show you how to install and configure all the components so you can start registering databases for EUS. And, we’re going to do this in silent mode – meaning it’s all command line and response files instead of OUI screen shots.